Motia Icon
Development Guide

Real-time Streams

Push live updates from your backend to connected clients without polling. Perfect for AI responses, chat apps, and long-running tasks.

Why Streams?

Building modern apps means dealing with long-running tasks - AI responses that stream in word by word, file processing that takes time, or chat messages that need to appear instantly.

Without Streams, you'd need to:

  • Build polling logic on the frontend
  • Set up WebSocket infrastructure manually
  • Manage connection states and reconnection
  • Handle data synchronization yourself

With Motia Streams, you get all of this out of the box. Just define what data you want to stream, and Motia handles the rest.

Some Use Cases for Streams

  • AI/LLM responses → Stream ChatGPT responses as they generate
  • Chat applications → Real-time messaging and typing indicators
  • Long processes → Video processing, data exports, batch operations
  • Live dashboards → Real-time metrics and notifications
  • Collaborative tools → Real-time updates across multiple users

Creating a Stream

Streams are just files. Create a .stream.ts file in your steps/ folder and export a config.

steps/chat-messages.stream.ts
import { StreamConfig } from 'motia'
import { z } from 'zod'
 
export const config: StreamConfig = {
  name: 'chatMessage',
  schema: z.object({
    id: z.string(),
    userId: z.string(),
    message: z.string(),
    timestamp: z.string()
  }),
  baseConfig: {
    storageType: 'default'
  }
}

👉 That's it. Motia auto-discovers the stream and makes it available as context.streams.chatMessage in all your handlers.


Using Streams in Steps

Once you've defined a stream, you can use it in any Step through context.streams.

Stream Methods

Every stream has these methods:

MethodWhat it does
set(groupId, id, data)Create or update an item
get(groupId, id)Get a single item
delete(groupId, id)Remove an item
getGroup(groupId)Get all items in a group
send(channel, event)Send ephemeral events (typing, reactions, etc.)

Think of it like this:

  • groupId = Which room/conversation/user
  • id = Which specific item in that room
  • data = The actual data matching your schema

Real Example: Todo App with Real-Time Sync

Let's build a todo app where all connected clients see updates instantly.

This is a real, working example from the Motia Examples Repository. You can clone it and run it locally!

Step 1: Create the stream definition

steps/todo.stream.ts
import { StreamConfig } from 'motia'
import { z } from 'zod'
 
const todoSchema = z.object({
  id: z.string(),
  description: z.string(),
  createdAt: z.string(),
  dueDate: z.string().optional(),
  completedAt: z.string().optional()
})
 
export const config: StreamConfig = {
  name: 'todo',
  schema: todoSchema,
  baseConfig: { storageType: 'default' }
}
 
export type Todo = z.infer<typeof todoSchema>

Step 2: Create an API endpoint that uses streams

steps/create-todo.step.ts
import { ApiRouteConfig, Handlers } from 'motia'
import { z } from 'zod'
import { Todo } from './todo.stream'
 
export const config: ApiRouteConfig = {
  type: 'api',
  name: 'CreateTodo',
  method: 'POST',
  path: '/todo',
  bodySchema: z.object({
    description: z.string(),
    dueDate: z.string().optional()
  }),
  responseSchema: {
    200: z.object({
      id: z.string(),
      description: z.string(),
      createdAt: z.string(),
      dueDate: z.string().optional(),
      completedAt: z.string().optional()
    }),
    400: z.object({ error: z.string() })
  },
  emits: []
}
 
export const handler: Handlers['CreateTodo'] = async (req, { logger, streams }) => {
  logger.info('Creating new todo', { body: req.body })
 
  const { description, dueDate } = req.body
  const todoId = `todo-${Date.now()}-${Math.random().toString(36).substring(2, 9)}`
 
  if (!description) {
    return { status: 400, body: { error: 'Description is required' } }
  }
 
  const newTodo: Todo = {
    id: todoId,
    description,
    createdAt: new Date().toISOString(),
    dueDate,
    completedAt: undefined
  }
 
  // Store in the 'inbox' group - all clients watching this group see the update!
  const todo = await streams.todo.set('inbox', todoId, newTodo)
 
  logger.info('Todo created successfully', { todoId })
 
  return { status: 200, body: todo }
}

What happens here:

  1. Client calls POST /todo with a description
  2. Server creates the todo and calls streams.todo.set('inbox', todoId, newTodo)
  3. Instantly, all clients subscribed to the inbox group receive the new todo
  4. No polling, no refresh needed

👉 Every time you call streams.todo.set(), connected clients receive the update instantly. No polling needed.


Restricting Stream Access

Streams can now enforce authentication and authorization rules so that only approved clients can subscribe.

1. Configure streamAuth in motia.config.ts

motia.config.ts
import type { StreamAuthRequest } from '@motiadev/core'
import { config } from 'motia'
import { z } from 'zod'
 
const streamAuthContextSchema = z.object({
  userId: z.string(),
  plan: z.enum(['free', 'pro']),
  projectIds: z.array(z.string()),
})
 
const extractAuthToken = (request: StreamAuthRequest): string | undefined => {
  const protocolHeader = request.headers['sec-websocket-protocol']
  if (protocolHeader?.includes('Authorization')) {
    const [, token] = protocolHeader.split(',')
    if (token) {
      return token.trim()
    }
  }
 
  if (!request.url) return undefined
 
  try {
    const url = new URL(request.url, 'http://localhost')
    return url.searchParams.get('authToken') ?? undefined
  } catch {
    return undefined
  }
}
 
export default config({
  streamAuth: {
    contextSchema: z.toJSONSchema(streamAuthContextSchema),
    authenticate: async (request: StreamAuthRequest) => {
      const token = extractAuthToken(request)
      if (!token) return null
 
      // look up the token in your auth system
      const session = await mySessionStore.get(token)
      if (!session) {
        throw new Error(`Invalid token: ${token}`)
      }
 
      return session
    },
  },
})

Motia uses contextSchema to generate the StreamAuthContext type inside your project's types.d.ts and stores whatever authenticate returns as authContext on the WebSocket connection. Returning null means the client is anonymous.

2. Apply fine-grained rules with canAccess

Each stream can expose an optional canAccess function that receives the subscription info plus the StreamAuthContext value returned by your authenticate function.

steps/chat-messages.stream.ts
export const config: StreamConfig = {
  name: 'chatMessage',
  schema: chatMessageSchema,
  baseConfig: { storageType: 'default' },
  canAccess: ({ groupId, id }, authContext) => {
    if (!authContext) return false
    // only allow users that are part of the project backing this chat
    return authContext.projectIds.includes(groupId)
  },
}

canAccess can be synchronous or async. If it's not defined, Motia allows every client (even anonymous ones) to subscribe. If you remove the function from a stream that previously had one, Motia evaluates it out-of-process using the generated runner (useful for Python/Ruby streams).

3. Send tokens from the client

Provide an auth token when creating the stream client by embedding it in the WebSocket URL. Motia will read it in authenticate before authorizing subscriptions.

App.tsx
import { useMemo } from 'react'
import { MotiaStreamProvider } from '@motiadev/stream-client-react'
 
function AppShell({ session }: { session?: { streamToken?: string } }) {
  const streamAddress = useMemo(() => new URL('ws://localhost:3000').toString(), [])
  const protocols = useMemo(() => {
    return session?.streamToken ? ['Authorization', session.streamToken] : undefined
  }, [session?.streamToken])
 
  return (
    <MotiaStreamProvider address={streamAddress} protocols={protocols}>
      <App />
    </MotiaStreamProvider>
  )
}

When you pass the token via the protocols prop Motia sends it as Sec-WebSocket-Protocol: Authorization,<token>, matching the Workbench Stream RBAC plugin (ActiveStreamConnection.tsx).

Using the browser/node clients directly:
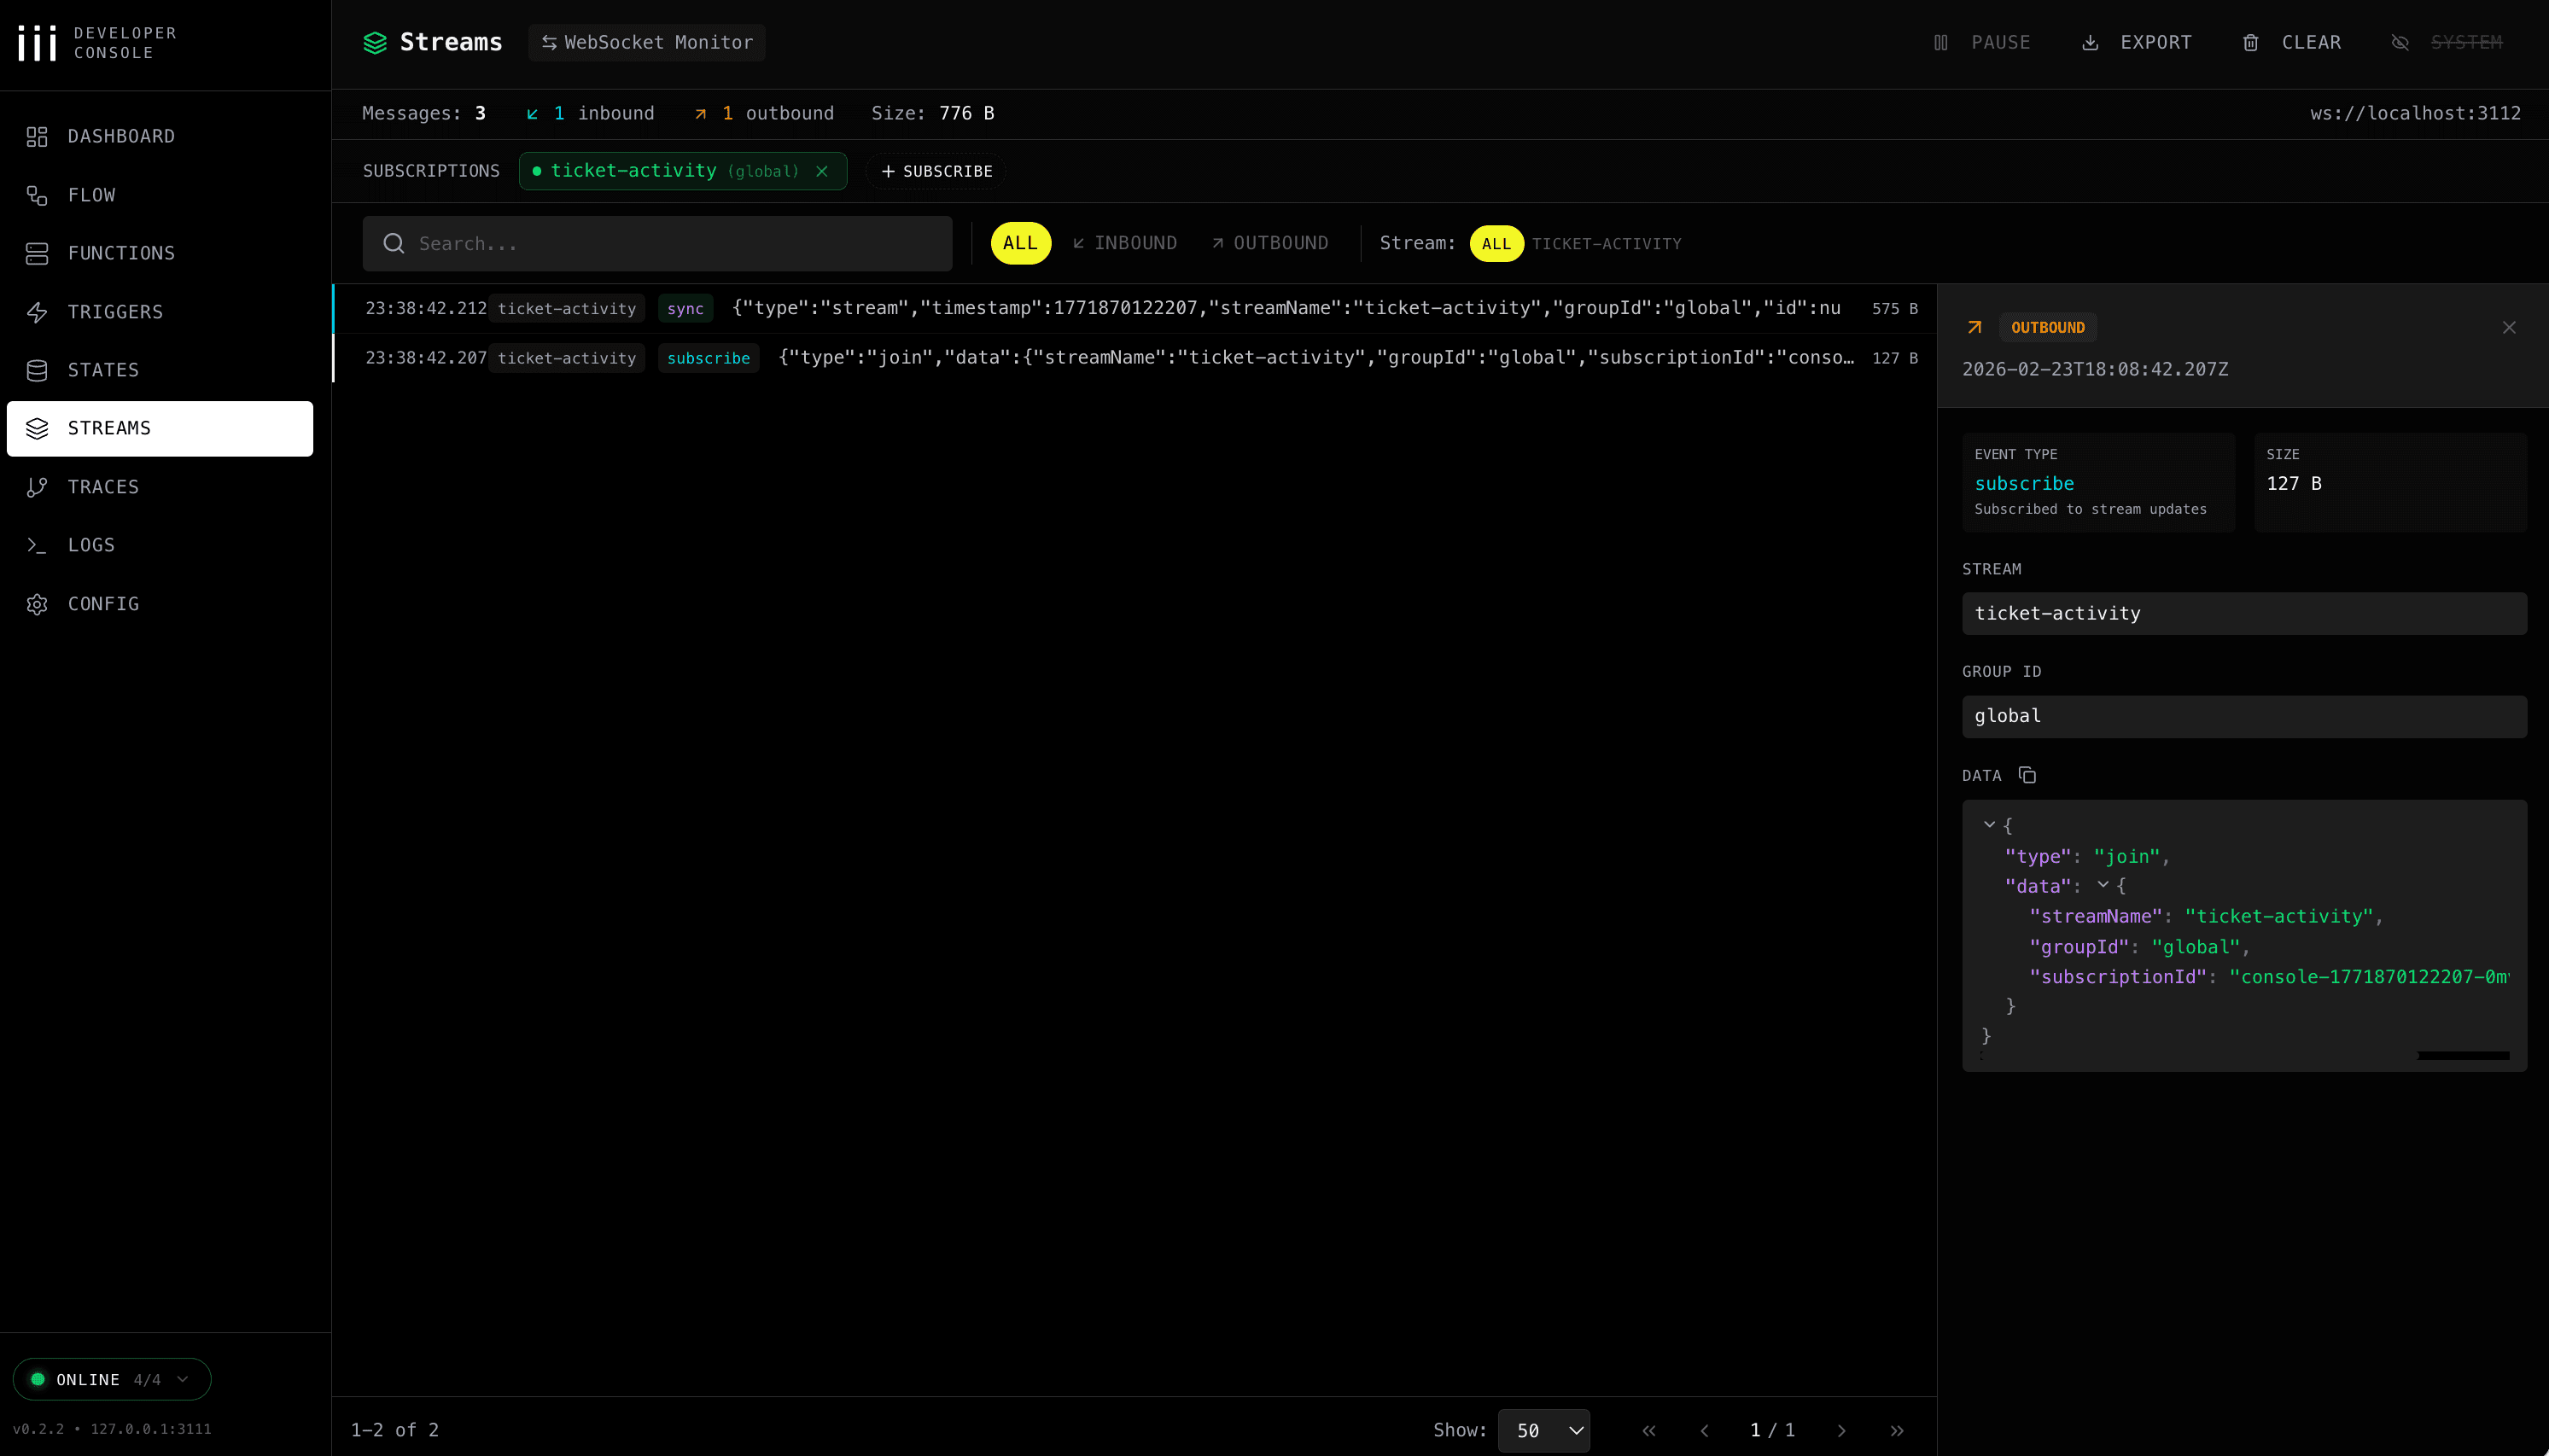
import { Stream } from '@motiadev/stream-client-node'
 
const url = new URL('wss://api.example.com/streams')
if (process.env.STREAM_TOKEN) {
  url.searchParams.set('authToken', process.env.STREAM_TOKEN)
}
 
const stream = new Stream(url.toString())

On the server side Motia validates the token (via authenticate), stores the resulting context on the WebSocket, and calls canAccess before creating a subscription. Unauthorized clients receive an error event and no subscriptions are created.


Testing Streams in Workbench

Testing real-time features can be tricky. Workbench makes it easy.

How to test:

  1. Make sure your API Step returns the stream object:
return { status: 200, body: todo } // result from streams.todo.set()
  1. Open http://localhost:3000/endpoints
  2. Watch the stream update in real-time

Stream Test in Workbench

👉 Workbench automatically detects stream responses and subscribes to them for you.


Using Streams in Your Frontend

Once you have streams working on the backend, connect them to your React app.

Install

npm install @motiadev/stream-client-react

Setup Provider

Wrap your app with the provider:

App.tsx
import { MotiaStreamProvider } from '@motiadev/stream-client-react'
 
function App() {
  const authToken = useAuthToken() // e.g. from cookies or local storage
 
  return (
    <MotiaStreamProvider address="ws://localhost:3000" authToken={authToken}>
      {/* Your app */}
    </MotiaStreamProvider>
  )
}

Subscribe to Stream Updates

App.tsx
import { useStreamGroup } from '@motiadev/stream-client-react'
import { useTodoEndpoints, type Todo } from './hook/useTodoEndpoints'
 
function App() {
  const { createTodo, updateTodo, deleteTodo } = useTodoEndpoints()
  
  // Subscribe to all todos in the 'inbox' group
  const { data: todos } = useStreamGroup<Todo>({ 
    groupId: 'inbox', 
    streamName: 'todo' 
  })
 
  const handleAddTodo = async (description: string) => {
    await createTodo(description)
    // No need to manually update UI - stream does it automatically!
  }
 
  return (
    <div>
      <h1>Inbox</h1>
      {todos.map((todo) => (
        <div key={todo.id}>{todo.description}</div>
      ))}
    </div>
  )
}

How it works:

  1. useStreamGroup() subscribes to all items in the inbox group
  2. When server calls streams.todo.set('inbox', todoId, newTodo), the todos array updates automatically
  3. React re-renders with the new data
  4. Works across all connected clients!

Todo App in React

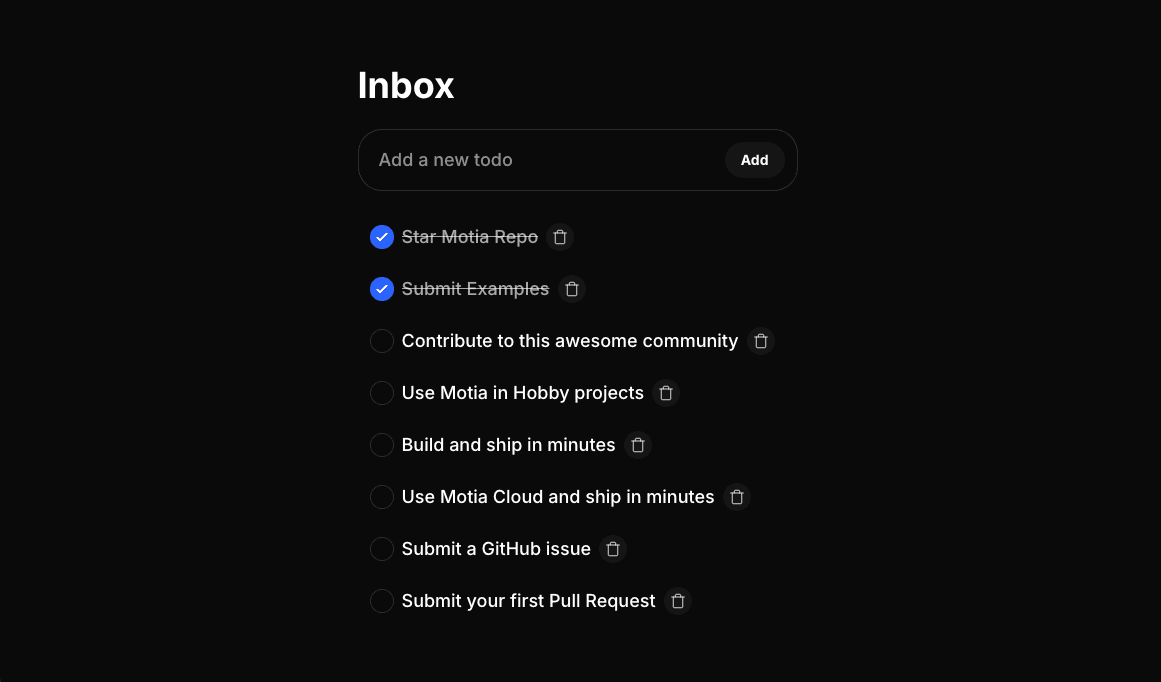
👉 Every time you call createTodo(), connected clients receive the update instantly. No polling needed.


Ephemeral Events

Sometimes you need to send temporary events that don't need to be stored - like typing indicators, reactions, or online status.

Use streams.<name>.send() for this:

// Send typing indicator
await streams.chatMessage.send(
  { groupId: channelId }, // No id = broadcasts to all subscribers in group
  { type: 'typing', data: { userId: 'user-123', isTyping: true } }
)
 
// Send reaction to specific message
await streams.chatMessage.send(
  { groupId: channelId, id: messageId }, // With id = only subscribers to this item get it
  { type: 'reaction', data: { emoji: '👍', userId: 'user-123' } }
)

Difference from set():

  • set() → Stores data, clients sync to it
  • send() → Fire-and-forget events, not stored

Stream Adapters

Stream adapters control where and how stream data is stored. Motia provides default adapters that work out of the box, and distributed adapters for production deployments with multiple instances.

Default Adapter (File Storage)

No setup needed. Streams are stored in .motia/streams/ directory.

motia.config.ts
import { config } from '@motiadev/core'
 
export default config({
  // Uses FileStreamAdapter by default
  // Streams stored in .motia/streams/
})

The default FileStreamAdapter is perfect for single-instance deployments, development, and testing. Real-time updates work seamlessly within a single instance.

Distributed Adapter (Redis)

For production deployments with multiple Motia instances, use Redis to synchronize streams across instances. This ensures all connected clients receive updates regardless of which instance handles the request:

motia.config.ts
import { config } from '@motiadev/core'
import { RedisStreamAdapter } from '@motiadev/adapter-redis-streams'
 
export default config({
  adapters: {
    streams: new RedisStreamAdapter({
      host: process.env.REDIS_HOST || 'localhost',
      port: parseInt(process.env.REDIS_PORT || '6379'),
    }),
  },
})

Use distributed stream adapters (like Redis) when running multiple Motia instances. Without them, stream updates are only visible to clients connected to the instance that created them.

Your Step code stays the same:

// Works with both file and Redis adapters
export const handler: Handlers['Chat'] = async (req, { streams }) => {
  await streams.messages.set('chat-123', 'msg-1', {
    content: 'Hello!',
    userId: 'user-1',
    timestamp: Date.now(),
  })
  // ... rest of your code
}

The adapter handles the storage backend and synchronization - your application code doesn't change. All connected clients receive updates in real-time, regardless of which instance processes the request.

Learn more about adapters →


Remember

  • Streams = Real-time state that clients subscribe to
  • Every set() call pushes updates to connected clients instantly
  • Use send() for temporary events like typing indicators
  • Test in Workbench before building your frontend
  • No polling needed - WebSocket connection handles everything

What's Next?

Need help? See our Community Resources for questions, examples, and discussions.